Solar Installation Guide

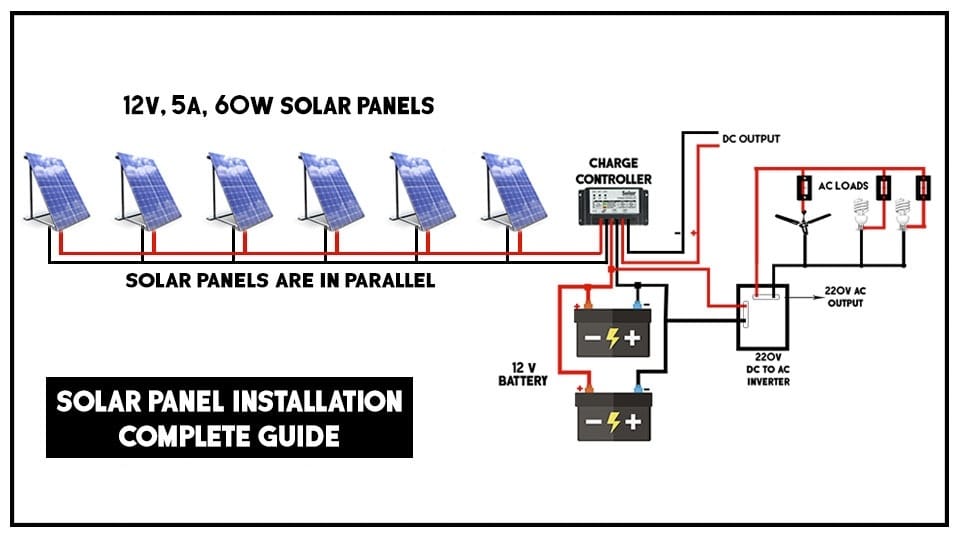
Installing a solar power system is a significant step towards reducing energy costs and contributing to a more sustainable environment. This guide provides a comprehensive overview of the solar installation process, from initial planning to final commissioning, ensuring that your solar system is installed efficiently and safely.

Step 1: Initial Planning and Assessment

1.1. Energy Needs Assessment

  • Objective: Determine the energy requirements of your home or business.
  • Actions:
    • Review past electricity bills to understand your energy consumption patterns.
    • Consider any future energy needs, such as electric vehicles or home expansions.

1.2. Site Evaluation

  • Objective: Assess the suitability of your property for solar installation.
  • Actions:
    • Sunlight Exposure: Measure the amount of sunlight your property receives. Ideal sites have minimal shading and direct sunlight for most of the day.
    • Roof Condition: Inspect your roof’s age, material, and structural integrity. Ensure it can support the weight of solar panels.
    • Space Availability: Determine if there is enough space for the number of panels needed to meet your energy goals.

Step 2: System Design

2.1. Choosing the Right Components

  • Objective: Select the appropriate solar panels, inverters, and mounting systems.
  • Actions:
    • Solar Panels: Choose between monocrystalline, polycrystalline, or thin-film panels based on efficiency, cost, and space.
    • Inverters: Decide between string inverters, micro-inverters, or power optimizers to convert DC to AC power.
    • Mounting Systems: Choose roof-mounted, ground-mounted, or tracking systems based on site conditions.

2.2. System Sizing

  • Objective: Calculate the size of the solar power system needed.
  • Actions:
    • Estimate the total energy production required to meet your needs.
    • Design the system to cover a percentage of your energy usage, considering factors like budget and space.

2.3. Electrical Layout

  • Objective: Plan the wiring and connection of the system components.
  • Actions:
    • Create a wiring diagram that connects solar panels, inverters, and the electrical grid.
    • Ensure that the layout minimizes energy loss and complies with electrical codes.

Step 3: Permits and Approvals

3.1. Local Permits

  • Objective: Obtain the necessary permits before installation.
  • Actions:
    • Contact your local building authority to understand the permitting requirements.
    • Submit detailed plans of the installation, including site layout and electrical design.

3.2. Utility Interconnection

  • Objective: Coordinate with your utility provider to connect the solar system to the grid.
  • Actions:
    • Apply for interconnection approval, providing technical details of the system.
    • Understand the terms of net metering or other grid connection agreements.

Step 4: Installation Process

4.1. Mounting System Installation

  • Objective: Secure the mounting structure on which the solar panels will be placed.
  • Actions:
    • For roof-mounted systems, install the racking and ensure it is securely attached to the roof.
    • For ground-mounted systems, set up the foundation and mounting poles.

4.2. Solar Panel Installation

  • Objective: Install the solar panels onto the mounting system.
  • Actions:
    • Carefully lift and place the panels on the mounting racks.
    • Secure the panels in place, ensuring they are properly aligned and angled to maximize sunlight capture.

4.3. Wiring and Electrical Connections

  • Objective: Connect the solar panels to the inverters and the electrical system.
  • Actions:
    • Run electrical wiring from the panels to the inverter(s).
    • Connect the inverter to the electrical panel and the grid, following safety protocols and code requirements.
    • Install a solar meter if required by your utility company.

Step 5: System Testing and Commissioning

5.1. System Testing

  • Objective: Ensure the solar power system is functioning correctly.
  • Actions:
    • Perform a series of electrical tests to check for proper voltage, current, and power output.
    • Verify that the system is producing energy as expected and that all connections are secure.

5.2. Inspection and Approval

  • Objective: Obtain final approval from local authorities and utility companies.
  • Actions:
    • Schedule an inspection with your local building authority to review the installation.
    • Work with your utility company to complete the interconnection process and start using the system.

Step 6: Monitoring and Maintenance

6.1. Monitoring System Performance

  • Objective: Track the energy production and efficiency of your solar system.
  • Actions:
    • Install a monitoring system to keep track of real-time energy output.
    • Regularly review performance data to ensure the system is operating efficiently.

6.2. Maintenance

  • Objective: Keep the solar system in optimal working condition.
  • Actions:
    • Clean the solar panels periodically to remove dust, debris, and other obstructions.
    • Inspect the system regularly for any signs of wear, damage, or malfunction.
    • Schedule professional maintenance as needed to ensure long-term reliability.

Assure Energy System provides reliable solar and battery solutions, helping homes and businesses save energy and reduce costs. We offer expert design, installation, and maintenance to make clean energy simple and sustainable.

Contacts Now

No.51, Ward No 7 Secunderabad, Aruna Enclave, Tirumalagiri, Hyderabad, Secunderabad, Telangana 500015